Followers

Monday, February 18, 2013

The Homemade Gelli Plate Experiment

OK, so I kept hearing about Geli plates and wasn't quite sure what they were all about. Well of course if you Google anything you can find out more than you ever knew existed about something. Well that being said I learned about Gelli Plate Art.  Well.. It appears that there is currently only one manufacturer and it was more that I wanted to spend without knowing if I would like this type of art so.... I did what most guys like to do, I found a do it yourself substitute. There are several on YouTube with very clear step by step instructions. Below is my journey.
 
 
 This is my Gelli plate still in the tray. Plastic wrap on top and bottom. The layer on the bottom made it easier to remove from the tray. The layer on the top kept it from drying out in the fridge for its made from real gelatin.
 
 
This is how it looked removed from the tray but still on the bottom layer of the plastic wrap.
 
These are the paints I used for the experiment. Making Memories Scrapbook acrylic paints.
 
This is the plate covered in paint.


And this is the first full page print.
Honestly I wasn't to excited but kept playing with colors and the amount of paint.
 
 Decided to try a tag.
 
That became several tags in several color combos.
 
How about trying a stencil from Crafters Workshop. This is the image on white paper.
 

This is how it looked on black. I really like this one a lot!
 
How about some number tags? I think these will work great for Birthdays with all the numbers in the background.
 
  Here are some in different colors.
 

How about with an Umbrella man die cut as a stencil?  As you can see I quickly became very addicted. These are just a few of the tags I created. I really like this a lot and will be playing again. I will most likely end up buying a gelli plate but until then I love my homemade one. If you haven't tried it, do. I'm sure you will come up with some great creations too!


Monday, January 28, 2013

Round Robin Swap

Finally, A new Blog Post from me....
 
Over at Kindred Souls we are having a round robin journal swap where you make a journal, create your covers and a page then send it to the next player in line to create a page, and so forth and so forth until your book is finished.
Then the player that completes your last page sends it back to you.
 
Each player had to select a theme for their journal. Mine is Eclectic Vintage Gentlemen.
 
 
This is the cover of my journal.
 
 
This is the page I created. I used a photograph of old paparazzi. I have had this photo for a while and thought this would be the perfect place to use it. I covered my page in metal tape and embossed it for an industrial look.


This is the back of my page. I kept it simple with some patterned paper an a stamped image reminiscent of Laurel and Hardy.

 
I just cant wait to see all the great art that comes back in my journal for their are some great artist playing along.

Tuesday, January 1, 2013

Saturday, September 8, 2012


HAPPY BLOG-VERSARY TO ME!
MY BLOG TURNS 3!

Its hard for me to believe that my blog has turned the ripe old age of 3. 
I would have never imagined that I would keep and maintain this blog running for 3 years.

Thank you to those that have been with me since the start and to all that have decided to follow me.  I couldn't have ever dreamed that people would like my art and be so encouraging.
I'm working on getting a blog candy give away put together so stay tuned and 
THANKS EVERYONE! 


Monday, August 20, 2012

Anything Goes - Halloween Chaos

This week over at Simon Says Stamp and Show, the challenge was
Anything Goes!

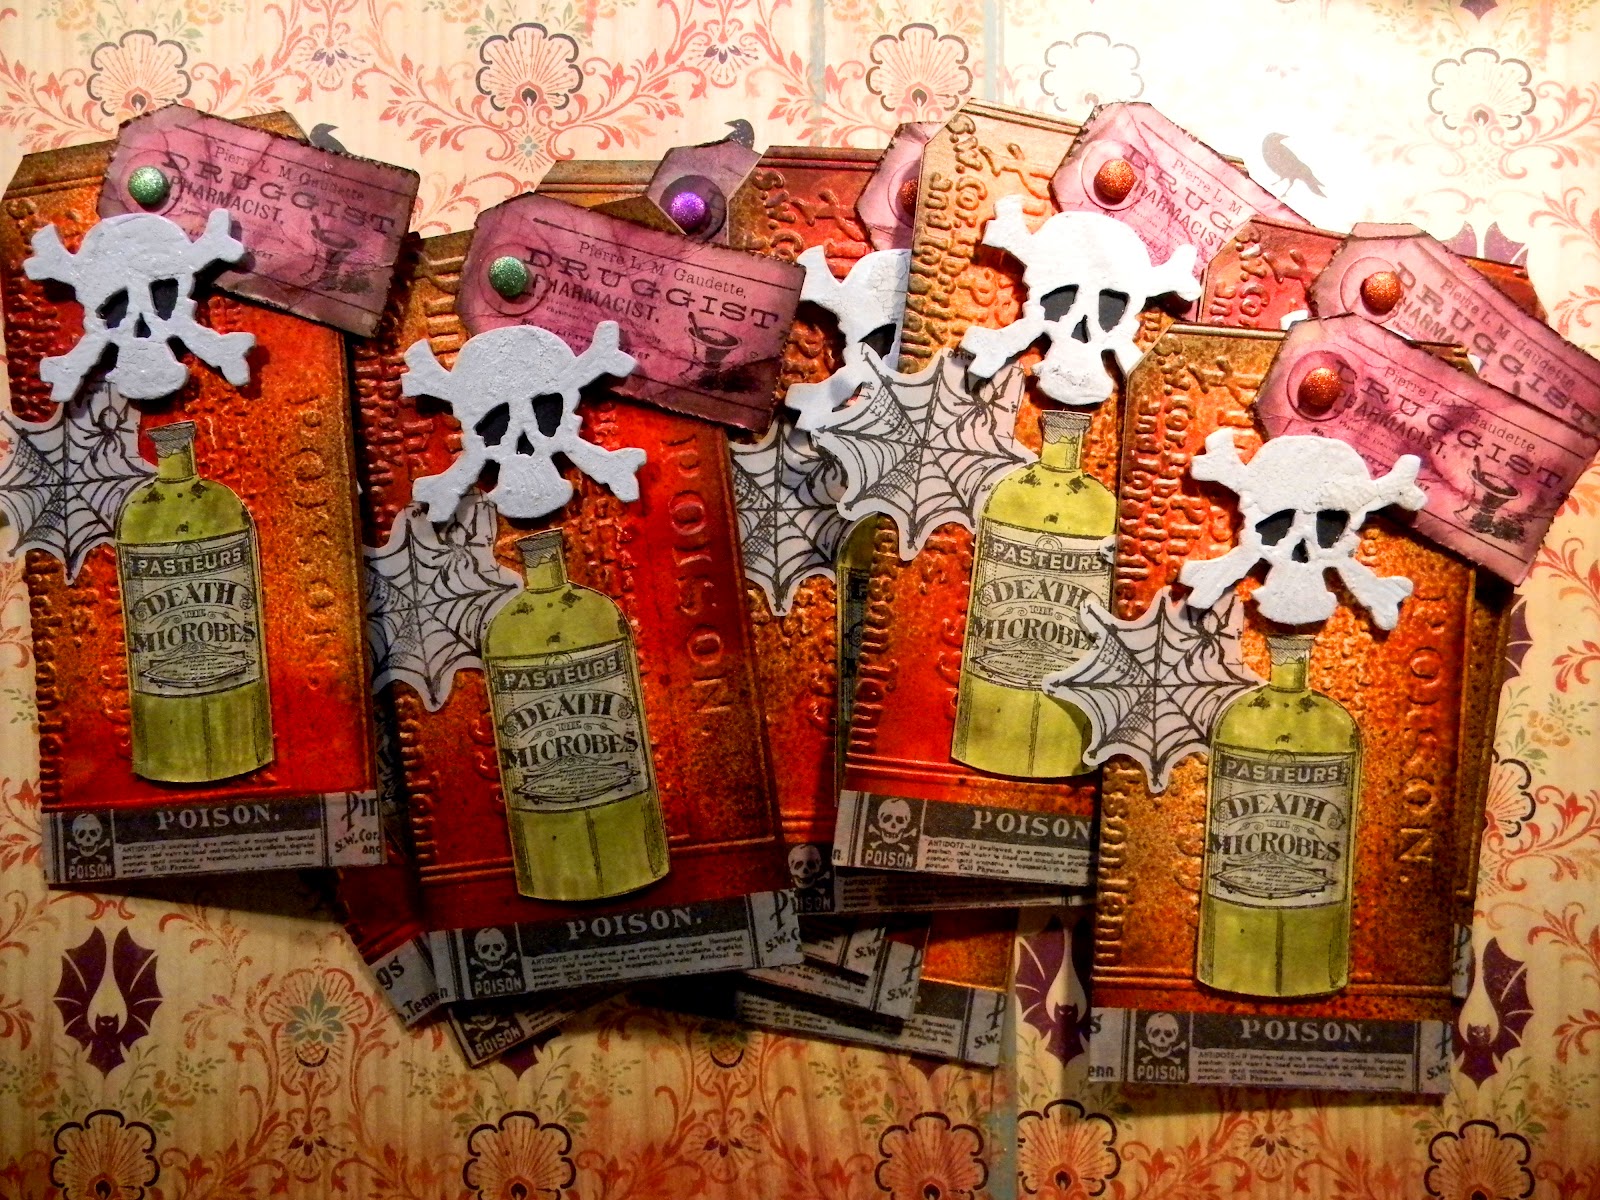
So I decided to use my tags that were created for the Halloween Chaos Swap on


Each player was to make 12 tags and get a incredible collaborative piece back from the wonderful swap hostess Stacy Cook.

Below are the tags I created.


Each tag is made using almost Tim Holtz products exclusively with the exception of the poison bottle stamp which is from Graphic 45.


I embossed, sprayed and inked all my tags. Covered the grunge board skulls with Rock Candy and used Hobgoblin tissue tape across the bottoms.
After stamping out the bottles I painted them with Distress Ink markers.

Using Tim's new Mini Blueprint stamp set I stamped spiderwebs on vellum for a finishing touch. 
I absolutely cant wait to see the finished piece from Stacy.


Sunday, July 15, 2012

Altered Cigar Box

OK, So I know you are saying what does Sea Shells have to do with an Altered Cigar box.
Well my partner on this exchange said they liked everything to do with the beach so since I can't take them to to beach I am bringing the beach to them.


This is the top of the cigar box.
 Sea shells arranged in the center of the lid created a focal point. I covered the whole box in decorative paper and tissue tape then ran a piece of contrasting ribbon around the outside.


As you can see I also included round wooden finials on top and barrel shaped ones on the bottom to mimic the look of an old boardwalk from times gone by.This is the view from the back.
Notice the light house 


 This is the view from the front adorned with a sail boat.


And this is the inside. I told you I was bringing the beach to them. Blue Sky and warm sand adorn the inside of the box. I also included some loose shells just for fun. 
The lid is hinged with chain since I used real shells on the top to stop the lid from flipping the box over since the shells are so heavy.


And of course I had to a tag and some vintage beach photos for the new owner to play with. 
I hope they enjoy it as much as I did making it. This was my first altered cigar box, but somehow I don't think it will be my last.


Wednesday, June 20, 2012

Technique 10: Tissue Wrap Flowers

This week over at Studio L3 the Challenge is:
Technique 10: Tissue Wrap Flowers


I used this challenge to make a monochromatic tag, yes there is a tag behind all that you are looking at.
It's been a while since I created a monochromatic piece and using the black and white tissue wrap inspired me to do so.
The dancing ladies is a stamp from Lost Coast Designs that just makes me smile. The tissue wrap flower and tidings bow seem to mimic the dancers headgear.


Here is a close up of the flower. I know many are posting that they had difficulty in making them look like flowers. I must confess this is my first attempt and I came out perfect.
 Almost like a paper carnation.

I think that I will use this piece as art to abandon for someone to find. 
Click here to read more about Art Abandonment.