Followers

Sunday, January 4, 2015

The Documented Life Project - 2015

RESURRECTING THE BLOG

Im so excited to have been inspired by my online birth sister Angie Hall Haviland to join 

Its an online art journal journey where we will be documenting our lives this year by telling our stories through art and words.

The online course will inspire you to share your vision of storytelling through color, texture and technique. Working through 52 prompts, you can build your confidence and fill your tool chest with elements that you will reach for over and over again.

PLUS To add to the excitement, they have gathered an amazing line up of superstars including Dyan Reaveley, Dina Wakley, Gina Lee Kim and Stephanie Ackerman to inspire us with their documenting art styles. 

Best of all the project is FREE !!!!

This week the inspiration is:

The Blank Page and How to Face it.
Art Challenge: Book Paper
Journal Prompt: Be Your Own Goal Keeper

Below is my interpretation.


This is my goal.


I hope you will consider joining for it looks to be an amazing journey and all for Free!!
Until next week.

Friday, December 20, 2013

LWD Design Team Showcase: " Heidi Swap Cluster Hearts Stencil and Tattered Angels Glimmer Mists"

As most of you know this will be my last post as a DT Design Member for Lone Wolf Designs.
I have loved every moment of my time with the great group of designers that make up the team.
Now on to the post!

I know a lot of you will say Valentines? Really already? Well... As you know its never too early for us crafters an I just had to show you this new Cluster Hearts stencil by Heidi Swapp.

I will also be using Tattered Angels Glimmer Mist in this project. So lets get inky!


I first placed my stencil over some white rose printed scrapbook paper and misted with Viva Pink.

Now this is where the cool part comes in. Before I lifted the stencil I placed another piece of scrapbook paper face down over the stencil and used my brayer to pick up all the ink that's on the surface of the stencil. 


And this is what you get. A positive and a negative image of your stencil.
Well you could stop there but the fun part is here. Reposition your stencil slightly off an mist with another spray. I used Electric Blue. Again place your second paper on top and use your brayer to pick up the color. Stop there? Oh no, Reposition a third time and spray with Lemon Zest.


This is after the Electric Blue mist.


 And this is after the Lemon Zest. You can see this causes a cool 3D effect. Don worry about not getting the paper lined up exactly each time, that's what gives the great effect that the colors are just slightly off kilter of each other.
Here is a close up after the 3 sprays. I just love the effect you get.
Now what to do with these cool papers?


I cut one and matted it on card stock then used it as a card front. I wanted the paper to be the star so I kept it simple and stamped one word, Forever.


Which I embossed just to get a little texture. 


With another piece I covered a tag that I will most likely use attached to some candy for Valentines.
The possibilities are endless, journal pages, scrapbooks, etc... The technique can be very addicting for the results are different each time.


I hope I have inspired you to play and experiment with your stencils and sprays and give this technique a try.


Remember you can find all these product and more at 25% off MSRP at
 Lone Wolf Designs, LLC 
 
Get the insider pricing at:

 Facebook group. If you haven’t joined us yet, you’re paying too much for your craft supplies! 


Friday, November 8, 2013

LWD Design Team Showcase: " Alterations Dies by Sizzix"


Well its that time again, my turn up for the Design Team Showcase for Lone Wolf Designs.
This time I want to showcase Alterations Dies designed by Tim Holtz for Sizzix.

The dies I'm using for this showcase are the Pumpkin Jack mover and shaper, the strip die Tattered Banners and the strip die Autumn Gatherings. I know you may be thinking I've seen these used before but hopefully I can show you something that you may have not tried.


First using the Pumpkin Jack die cut both the pumpkin and the stem from thin chipboard.


Now here is the trick part. We are creating a card in the Pumpkin shape.
In order to do this you need to take an A2 card and line the seam side just shy of the edge of the die cut so the card keeps its seam so when cutting you are not creating separate two pieces.


Here's a closer shot after I ran the die though the machine.
You can see that the seam edge of the card is inside of the die cut shape on the right.

Next take some Ranger Paint dabbers and color the chip board pieces.
These are the colors I used.

Once the chipboard is dry paint over the pieces with Distress Rock Candy Crackle Paint.
I used a brush and purposely left vertical streaks to mimic the texture of a pumpkin.

While that dries use the Autumn Gatherings die to cut multiple shapes from different fall colors and ink them using Ranger Distress Inks.

Once your pumpkin piece is dry use Distress Stain and go over the pieces to accentuate the crackle effect. I used the Walnut stain color.


Using Ranger Glossy Accents begin gluing the Autumn Gatherings pieces in an arrangement near the bottom of the pumpkin.


 I then covered just the acorn shaped pieces completely in glossy accents to make them stand out from the matte surface of the leaves.

After cutting a banner from the Tattered Banners die I stamped it with a phrase from
Tim Holtz's Simple Sayings stamp set. 
 I just love the way this turned out and hope I have inspired you to try and use your Bigz Dies to create some shaped cards of your own.


As you can see below this technique can be achieved from many of the larger Bigz Dies. After cutting your cards, just cut whole pieces from chip board, card stock or grunge board to cover the fronts and decorate as desired.

 Of course you can find all these product and more at 25% off MSRP at
 Lone Wolf Designs, LLC 
 
Get the insider pricing at:

 Facebook group. If you haven’t joined us yet, you’re paying too much for your craft supplies! 

Thursday, September 26, 2013

"LWD Design Team Showcase: " Tim Holtz Distress Paints"

 
It's that time again for me to showcase another great product that you can get from
This time its all about Tim Holtz Distress Paint!
 
 
I want to show you one of my favorite ways to use Distress Paint wrinkle free distress.
First pick a few colors and apply them to your Ranger Non stick craft sheet.

 
Next take a Manila tag and swipe it though all the paint. 
 
Now here is where the fun begins. Once you have your tag covered in paint, spritz the tag with just some plain ol' water. 
 
Since Distress Paint is reactive with water, you can tilt and turn you tag and get wonderful patterns and marbleizing. 


As I stated in my previous post I hate to waste any Distress product so...
 
I took a piece of scrapbook paper and used it to pick up all the paint left on my craft mat. I will use this later as a background on a card or possibly an art journal page.


Once you are happy with your tag use your heat tool to dry thoroughly before adding any stamping.
 
 
Here is a close up where you can see the fantastic patterns you can achieve with Distress Paint.

 
To finish this tag I'm using Tim Holtz Cling Rubber Stamps THANKFUL SILHOUETTES CMS116
 
 
First I stamped the background stamp on plain Manila card and cut out the word I wanted using Ranger Archival ink.
I found it works best when stamping on all my projects.


I used one of the Distress paints to edge the word.
 
 
Here is the finished tag after I stamped it with the wheat stamp from the set again using Ranger Archival ink, added the word and used some twine to embellish for a rustic fall look. 


This is another tag using this same technique. You can achieve an unlimited amount of looks with this paint.
 
 
This is the same technique on a Kraft tag. As you can see its a more subtle look.  

I hope you give Distress paints a try they are so fun to work with and the effects you can achieve are amazing. Until next time, Have Fun!


Of course you can find all these product and more at 25% off MSRP at
 Lone Wolf Desigins, LLC 
 
Get the insider pricing at:
 
 Facebook group. If you haven’t joined us yet, you’re paying too much for your craft supplies! 


Friday, August 23, 2013

"LWD Design Team Showcase: " Dylusions Ink Sprays, Stencils, & Stamps by Dyan Reaveley"

OK folks it time for my Second Team Showcase for Lone Wolf Designs.
This time I'm all about getting Dylusional....

If you haven't tried Dyan Reaveley's ink sprays, stencils and stamps then do yourself a favor and order some today. They are so much fun to work with and they produce incredible effects that are hard to achieve using other products. All her designs cant help but make you smile!


This is the stamp set I will be using for this showcase.
Pondering Petunia DYR34483


I will be using plain card stock and manila tags for today "Ghosting" example. Her products can be used on all types of dry paper mediums tags, card stock, cards, journal pages, etc...


Make sure you are working on a Inkssentials Craft Sheet by Ranger.
Begin by choosing colors at random just spray pools of color all over your card stock.
There is no right or wrong way to do this. Just spay until you are Happy!
.

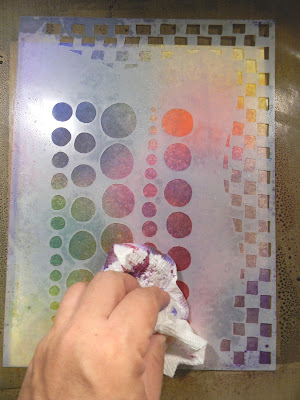
Next place a stencil of your choice over the inked card stock and spray liberally with water.
The stencil I'm using is called Chequered Dots DYS33981.


Then using some paper towel gently blot away the water from the open areas of the stencil. Make sure you get the water blotted from  all the openings.


When you remove the stencil you will see the "Ghost" image of the stencil. This is a great way to add depth to all your projects. You can spray and repeat this technique several times to get multiple layers of depth if you like.

Not wanting to waste any of the ink I like to use a tag to swipe up all that inky goodness off the craft sheet.


These are nice to have on hand for any future projects. You will have a tag with the first background layer already there.


This is a completed project I made for my art journal using these techniques.
 I used Copic markers to color the stamped image.


Being the frugal crafter I even save the paper towels to use in collage art pieces. I just love getting to use every bit of the ink I can. 

I hope this has inspired you to give Dyan's products a try. You wont be disappointed.
Of course you can find all these product and more at 25% off MSRP at
 Lone Wolf Desigins, LLC 
 
Get the insider pricing at:

 Facebook group. If you haven’t joined us yet, you’re paying too much for your craft supplies!